• Home
  • Media Kit
  • About
  • Privacy Policy
  • Terms Of Use
  • Contact
  • enCompass Media

Mommy Kat and Kids

Canadian Mom Blogger - Product Reviews, Travel, Food and Parenting

  • Articles
    • Family
    • Humour
    • Crafts
    • Money
    • Parenting
    • Relationships
    • Self-Esteem
    • Health
  • Blogging
    • Events
    • Opportunities
    • Wednesday WordPress
  • Reviews & Giveaways
    • Giveaway
    • Reviews
    • Giveaways Ending Soon
    • Coupon Code
    • Winners
  • Features
    • Anna’s Budget Tips
    • Wordless Wednesday
    • Friday Giveaway Linky
    • Sunday Quotes
  • Travel
    • Canada
    • USA
    • International
    • Events
  • Recipes
    • Lunch and Snacks
    • Main Dishes
    • Side Dishes
    • Desserts and Treats
    • Beverages
    • Pickles and Preserves
  • The $5000 Wedding
  • Holiday Gift Guide 2020

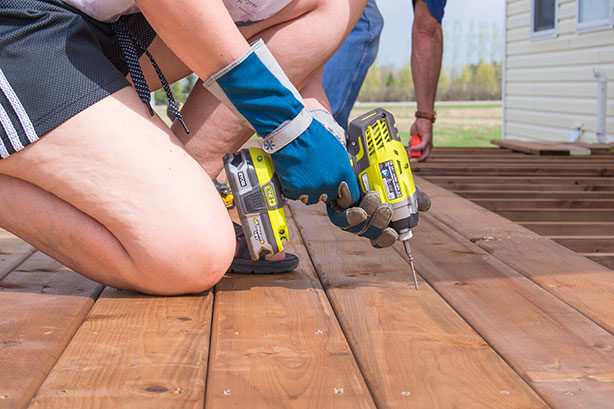
Steps and Ideas for Your DIY Deck Build

May 19, 2018 by Kathryn 2 Comments

mommy kat and kids rp2

Spring has finally arrived in Saskatchewan and I couldn’t be happier! But with a brand-new house on six acres of ungroomed prairie, I also couldn’t be busier! My husband and I have a list of the different jobs we want to complete this spring and summer, and we’ve already started tackling it.

deck-and-baby
Baby Cormac watching his new deck come together!

One of our biggest priorities was adding a back deck to our house. We were both a little nervous about it since neither of us had ever built a deck before. But with a lot of research and some help from family, we were able to complete our dream deck in just three days!

Planning a deck build of your own? Here’s the step-by-step process that helped take our deck from dream to reality:

Try Deck Designing Software

There are a few handy deck designing tools available online, and I had fun testing them out to create my perfect deck. Of course, every free tool wants to sell you something, so you may need to create a free account or register for a mailing list to get access. But it can be worth it to create a detailed, professional version of your dream deck.

deck-plans

Personally, I used the deck designing software from Decks.com to create my blueprint. It allowed me to download a blueprint and a complete list of materials, all with just a few minutes of time online! I decided on a large deck with angled corners and two sets of stairs.

Check with Your Building Inspector

While deck designing software is great, the blueprints are generally set to the highest possible building code standards. While that certainly means a deck will be built well, it can also mean it costs more than it needs to. When we checked in with our building inspector, we learned that instead of using the ten foundation posts that were on our blueprints, we could instead use only five and still have a solid deck.

deck-blocking
By putting these blocks in between our joists, we were able to eliminate five of our foundation piles!

Our inspector also gave us some tips on making sure that the length of our deck was properly supported, as well as some online resources that would help ensure we had all the information we needed to build a strong and long-lasting deck. The building permit cost $125 but being able to eliminate five foundation piles saved us $1000!

Consider Your Foundation

There are many different foundation options for a deck, from simple concrete pads to huge steel posts. The most common method of supporting a deck is usually digging a hole and then filling it with concrete. For our deck, we decided to spend a little more and use screw piles. Because Saskatchewan gets so cold in the winter, the longer metal supports stay below the frost line to prevent the deck from heaving.

deck-helical-pile-foundation
Helical, or screw piles, are long metal posts that are drilled into the ground to provide a solid foundation. In a province with extreme cold, they ensure the deck will stay in place without heaving.

The height of the deck also plays a part in choosing a foundation. A higher deck is especially sturdy when screw piles are used. A low deck may need no more than a concrete pad. And in warmer climates where frost doesn’t sink as deeply into the ground, a concrete post may be ideal. Whatever you choose, consider cost, durability and the work involved before making your choice.

Start the Build

With the foundation in place, the building can begin! A deck consists of layers, and our deck was comprised of sturdy six-by-six posts on top of our screw piles, a 3-ply 2×10 beam on top of the posts and then 2×10 joists on top of the beam. Joists are basically just supports for the deck and the boards that will go on top. And assembling the various layers is easy, but does take lots of measuring, cutting and securing!

deck-layers
The many layers of a deck! Foundation, post, three-ply beam and joists. On top of all this, the deck boards will be nailed into place.

When all the layers are in place, the deck boards can be screwed into the joists. The job is easy, but time consuming. And protecting my hands from splinters was a must! While my husband and father preferred their work gloves, I use my Dig It Long Cuff High 5 Gloves for DIY work like this. They feature unique cushioned fingertips to help protect my nails while I work. And I love how they’re fitted to my hands!

dig-it-gloves-and-deck
Screwing down deck boards with my Dig It gloves! They help protect my hands from splinters and keep my nails in shape thanks to padded fingertips.

Choosing a decking material is another important consideration. While composite deck boards are longer lasting, the low price of pressure treated lumber is a big plus. We chose brown pressure treated lumber for our deck boards. It did splinter a bit here and there when putting in screws, so I just sanded lightly over all the screws to help keep little feet safe.

Railings and Stairs

With our deck built and looking beautiful, we had only two more things to add: the railings and the stairs. Since the deck and our yard are so large, we wanted a set of stairs on either side of the deck. We decided to spend some extra money putting in white metal railings, to save ourselves any maintenance in the future. We’re now waiting for the railing to arrive, and I can’t wait to put it into place!

diy-deck-railing
Metal railing was a splurge, but we wanted to match our front deck and keep our maintenance to a minimum.

We decided to make the stairs five feet wide, using two 2×6 deck boards per stair for a nice, sturdy step. One of the biggest challenges we faced was finding the right height of angled stair stringers for our steps. It took us three tries to get it right! Then it was simply a matter of screwing the boards into place on each metal stair stringer to create our steps, then attaching those steps to the deck.

dig-it-gloves-and-glasses
I love how my gloves and glasses combine fashion and function! The tortoise-shell frames of these safety glasses are divine.

I am so excited to have our back deck completed and can’t wait to get our barbecue and patio set in place as soon as the railings are up. And throughout the building process, my Dig It Long Cuff High 5 Gloves and Eye Dig It Safety Sunglasses ensured that I was building as safely as possible. Whether a screw flew away from me when I was putting in deck boards, or I was lifting a splintered piece of wood, my hands and eyes were protected.

If you’re planning some DIY building this spring, make sure to grab your own pair of Dig It gloves and safety glasses. They’re fashionable, functional and will help you create the backyard oasis of your dreams. Whether you’re building a big back deck like ours or just laying down some paving stones in a favourite nook, Dig It products are the perfect accessory to your project!

Filed Under: Articles, Crafts, Gardening Tagged With: build a deck, build your own deck, building a deck, deck tips, dig it, dig it gardening gloves, dig it gloves, dig it safety glasses, diy deck, gardening, gardening gloves, landscaping, safety sunglasses, sunglasses

Create Your Dream Yard with 4 Simple Landscaping Tips

May 1, 2018 by Kathryn 5 Comments

This is a sponsored conversation written by me on behalf of TruGreen. The opinions and text are all mine.

In November of last year, my husband and I moved into our newly built custom dream house with our three boys. The house is stunning, and I still wake up every morning in awe of how perfectly it turned out. But the real appeal of the spot is the six acres of rolling prairie it sits on.

prairie-house-build

Since we moved into the house so late in the fall, we didn’t have a chance to do much landscaping. So, I can’t wait to get outside and do some landscaping this year! We have shelterbelt trees on the way, lilacs and berry bushes for borders, summer bulbs to plant and a deck to build.

With so much to do, I’ve spent a lot of time thinking about everything I want in our yard, and how to get it. And I’ve also discovered some landscaping tips for anyone planning their own backyard makeover! Whether you’re doing a minor refresh or a full overhaul, keep these four tips in mind to help you along.

1) Plan (and Draw) It Out

Start the process by making a list of all the elements you want for your yard. For our family, that was a large garden, fruit trees, a fire pit, a place for the kids to play and ample deck seating for entertaining. Next, draw out a rough sketch of the yard and start planning where you’d like each element to be. (Make sure to include any existing features in your drawing!)

boy-on-swing

I used a very simple drawing to start making plans for our yard and since it was a new build, the only obstacles I had were the septic tank and mound. I planned the rest of the yard by walking over the space frequently, noticing where the dips and rolls in the land were. Then I positioned the different areas to work with the flow of the land in the best way possible.

2) Decide On a Focal Point

When I was researching landscaping ideas, one concept kept reappearing again and again: every yard should have a focal point. Its purpose is to draw a person’s eye to the yard, so that they will then notice and admire the rest of the surrounding landscape.

house-focal-point

This was a hard concept for me, because with so much land around us, I feel like our house is the focal point. So, I’ll be accenting that with two Scots pine trees placed on either side of the house and some flowers in front of the deck. For smaller yards, a pretty bench or a birdbath also make beautiful focal points.

3) Learn Your Trees

If you’re new to gardening, you might find yourself overwhelmed by the sheer number of trees, shrubs and even grass seed varieties you have to choose from. And choosing too quickly could be a mistake if you’re not sure about what the plants are like in their maturity. In front of my previous house, for example, was a large Cottonwood Poplar that showered me with sticky seed pods and cottony seeds for most of the spring and summer months.

cherry-tree

Before you spend your hard-earned money, make sure you know how large your trees and shrubs will grow, how much maintenance they will require and what kind of growing pattern they have. There are trees that spread like weeds and trees that look beautiful but need heavy care to stay healthy. Make sure the ones you choose will suit your landscape and your gardening time!

4) Plan Your Maintenance

Depending on whether you love gardening and working outdoors or prefer spending your time lounging on the deck to scrounging in the dirt, planning your yard to suit your commitment level is a must. There are some great low-maintenance choices available for people that want to minimize yard work, from eco-friendly grass varieties that require less mowing to stylish rock gardens that provide zero-maintenance beauty.

trugreen-lawn-care

And if you know you won’t have time to protect trees from insects or spray for weeds, considering hiring a helping hand! TruGreen lawn and yard services offers comprehensive packages for lawn and tree maintenance that includes fertilizing, weed control, insect control, overseeding and more! Get a quote to see how affordable maintaining your dream yard can be.

Once your dream yard has come to fruition, it’s time to have fun with a few pretty and easy finishing touches! Check out the infographic below for some easy ways to upgrade your back yard and patio. Then have fun making your yard an oasis that the whole family will love.

backyard and patio upgrade infographic

Filed Under: Articles, Gardening Tagged With: back yard, beginner gardening, beginner landscaping, landscaping, landscaping tips, lawn, lawn care, tips, tree care, trees, trugreen, yard care, yard tips

  • Facebook
  • Twitter
  • Instagram
  • YouTube
  • Pinterest
  • RSS Feed

Search Mommy Kat and Kids

Current Giveaways

Mommy Kat and Kids
Jeulia Wedding Jewelry 2021

Enter your e-mail address:

Powered by FeedPress

Copyright © 2021 · Lifestyle Pro Theme on Genesis Framework · WordPress · Log in