
If your hallway is the part of your home you’ve been ignoring for years, you’re not alone.
Narrow hallways can be awkward to decorate, and tend to be more likely to get damaged by backpacks, toys, and anything else your family manages to drag through the front door.
If you’ve finally decided that your hallway deserves an upgrade, wall panelling can completely change the look of the space, without requiring a major renovation.
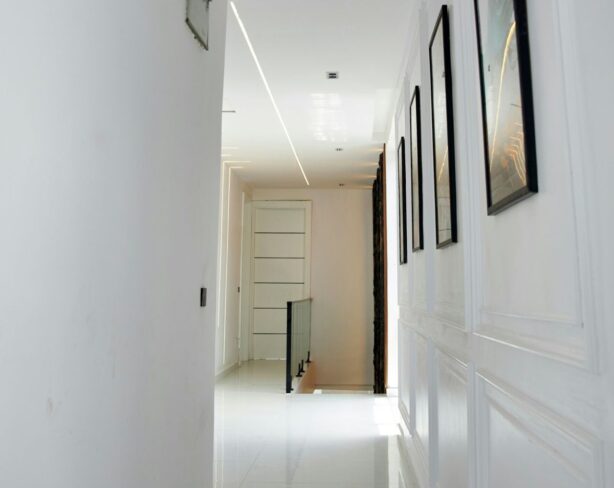
And, if you’re not particularly confident with power tools, a pre-cut kit can save you from having to measure and cut dozens of pieces yourself.
Full-height beaded panelling, specifically, is one of the best choices for making a narrow hallway feel clean and elegant.
The vertical lines draw your eye upward, helping the space feel taller, while the panel details add warmth and texture to your home.
Here’s how to take your hallway from forgettable to fashionable in one quick and easy weekend:
Benefits of a Pre-Cut Kit
Panelling can look deceptively simple in photos. Measure the wall, cut the strips at a proper angle, stick them up, and paint.
In reality, getting dozens of pieces to the same length, and then spacing them evenly, takes a fair amount of patience and precision.
If carpentry isn’t exactly your thing, a pre-cut kit can remove much of that work.
With a full height wall panelling kit, the beading is measured, cut, and labeled before it arrives.
That means you can spend more time getting the installation right, and less time worrying about whether you’ve just made an expensive mistake with a saw.
Before you start, lay everything out and check that you have all the pieces you need. If your kit includes spare strips, keep them somewhere safe.
Having an extra piece available can be useful if something gets damaged during installation.
Day One: Prep Your Surface
It’s tempting to start sticking the panels to the wall as soon as the kit arrives, but this is the worst mistake you can make.
The prep work might be the least exciting part of the project, but it has a huge impact on how professional the finished wall looks.
Step 1: Clean and Repair Walls
Start by filling dents and holes, then sand the wall so you have a reasonably smooth surface. Wipe away dust and debris before you begin.
Take a close look at the wall while you’re doing this.
Older walls aren’t always perfectly straight, and you may find slight bows or uneven sections.
Knowing about them beforehand gives you a chance to plan around them instead of discovering the problem halfway through installation.
Step 2: Measure Your Layout Before You Stick Anything Down
For a truly professional look , this is one step worth taking your time with.
Measure the full length of the wall, and work out how many sections of paneling you’ll be adding, and how wide each one should be.
The goal is to keep the spacing consistent from one end of the wall to the other.
Pay particular attention to the corners and end pieces. A very narrow final section can make the entire installation look uneven, even if everything else is perfectly straight.
Once you’ve worked out your measurements, mark the wall with pencil before installing anything.
A laser level can make this much easier, but a standard level will work as well. Either way, double check your work once the lines are drawn.
It might feel like overkill when you’re standing there drawing lines all over your wall, but it’s much less frustrating than discovering halfway through the job that your panels are slowly drifting out of alignment.
Day 2: Install Your Panelling
When your wall is properly prepped, you’re ready for the fun part!
Putting up your panelling can be quick and easy once you get into a rhythm, but keep these tips in mind to ensure you get the finished look you want:
Work From the Most Visible Area
When you’re ready to install the beading, start from the corner or section that’s most noticeable.
Apply adhesive to the back of each strip in a zigzag pattern, press it firmly against the wall and check that it’s level before moving on.
Give the adhesive enough time to grab before you let go, following the product instructions.
As you work across the wall, keep checking your measurements and spacing. It’s much easier to correct a small problem while you’re working on the next section, instead of doing it after the entire wall is finished.
For longer pieces, you may also want to use a few brad nails to hold everything securely while the adhesive cures.
If you depend on adhesive alone, you may find that those longer pieces start to slide out of place.
Don’t Skip the Caulk
If there’s one finishing step that can make a major difference, it’s caulking.
Once the panelling is installed, use caulk along the vertical edges and around the joints at the top and bottom.
This helps create a clean, finished appearance, and disguises small imperfections between the panelling and the wall.
It’s also one of the easiest ways to make a pre-cut kit look more like a custom installation.
Give the adhesive and the caulk plenty of time to cure before you move on to painting. Ideally, you’ll want to wait at least a full day.
Rushing this part can cause pieces to shift or come loose, leaving you with more work later.
Final Step: Painting
When your panelling has fully set, you can paint it to finish off your look.
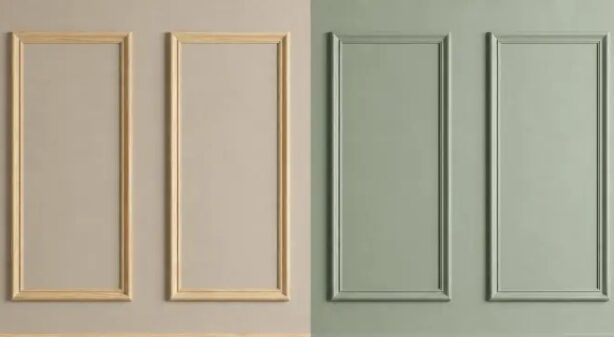
For a narrow space like a hallway, painting the panelling and the wall behind it the same colour is usually the best way to help the space feel more cohesive.
Choose Your Paint Carefully
When you decide on a paint colour, think about what your goal is with the space.
For a brighter look, stick with neutrals in shades of white or light grey, to help your hallway feel larger and more inviting.
If you want to go bolder, a light sage green or a light tan shade can give your hallway plenty of character without making it feel too dark.
An eggshell finish is usually the most practical choice for a high-traffic hallway, because it’s easier to wipe clean than a flat finish.
If you have kids, pets or both, it’s worth remembering that your freshly painted wall probably won’t stay pristine for long.
Choose a finish that can handle everyday life, rather than one that only looks good on the day you finish the project.
Is Hallway Panelling Worth It?
If you’ve been putting off updating your hallway because you assume it will require specialist skills or a major renovation, beaded wall panelling can be a relatively doable project.
It’s an affordable and surprisingly easy way to give your hallway a designer look that’s sure to impress friends and family.
Just remember that easy doesn’t mean rushed. It’s important to take your time and check your work as you go.
You’ll need time for preparation, measuring, installation, caulking and painting, so giving yourself a full weekend makes the process much less stressful.
A properly prepared wall, even spacing, straight panels, neat caulking, and a durable paint finish can turn an overlooked hallway into a feature, rather than just a space you walk through.
And you don’t need your entire house to be perfectly organized or professionally decorated to make it work.
You just need a weekend, a little patience and a plan, before you start sticking things to the wall.