

There’s nothing like spring to bring out my inner creativity, and this year I had the chance to really show off my springtime style with a fun trash to treasure spring makeover project!
Giving an outdated item new life is something I’ve always enjoyed, both because it saves money and because it lets me put a unique twist on items in our home.
While I had a few different project ideas, the one piece of furniture most in need of some tender loving care was our back yard picnic table, so I set out to take it from drab to fab with a budget of just $25!
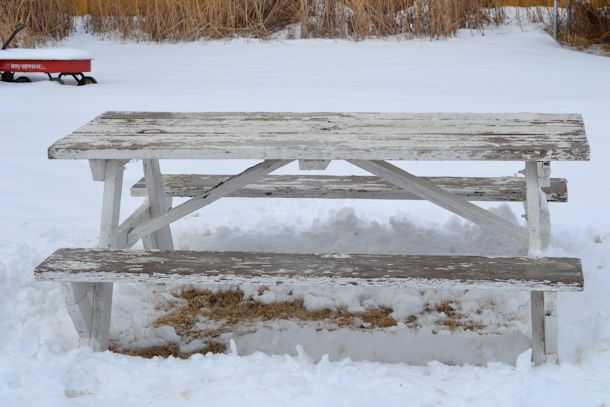
After two weeks of gorgeous weather, a huge snowstorm had me frightened I’d have to abandon the project, but I’d managed to cover the top of the table in time to keep it dry enough for the makeover. My blow dryer came in handy as well for ensuring the seats were dry enough to sand and paint.
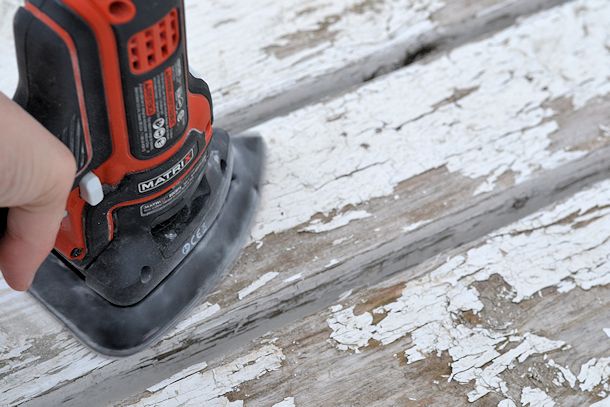
I started by using the sanding attachment on my power drill to smooth the top and seats while removing the peeling paint at the same time.
Then I gave the table a quick coat of white paint using a basic indoor white that I had left over from a room renovation. Since I was going to be varnishing the table, I didn’t worry about using anything too heavy duty.
The matte paint created a great rustic look on the table since some of the previous thicker paint showed through as well. When the paint was dry, it was time to really start the makeover!
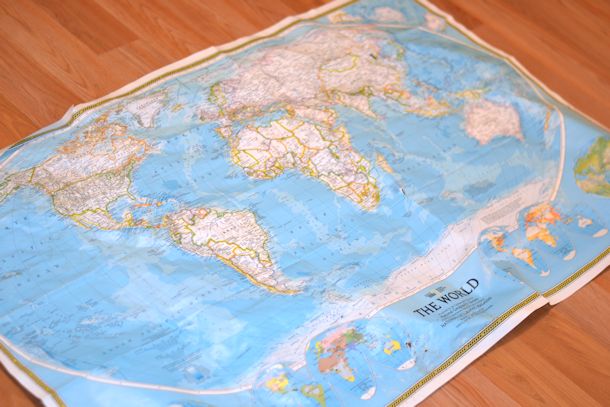
I had recently found an old world map that had once been hanging in the basement playroom but had fallen down and gotten rather battered. My goal was to use it to decorate the top of the table.
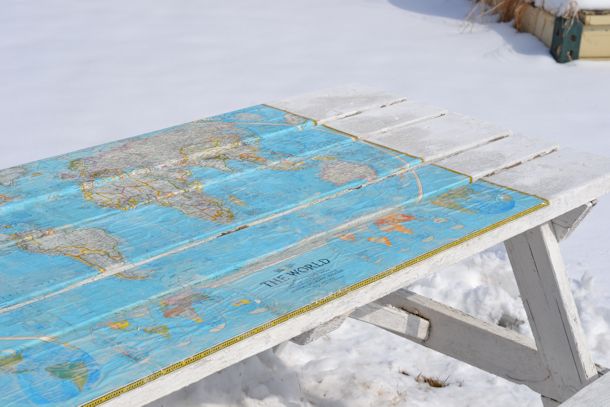
First, I cut it into appropriately sized strips to fit the top boards. Then I spread the strips with a mix of one part outdoor wood glue and one part water and glued the paper down carefully.
To really get it sticking, applying another layer of glue mixture to the top was a must. And beware, sticking down the edges is definitely a hands-on job! With the paper in place, I left the table to dry thoroughly overnight.
So far I’d been able to complete the entire project with items I already had. But now I needed to make sure that the look would last, and for that I needed a high-quality outdoor varnish.
Since I had a few car-related items to buy as well, I headed to Canadian Tire the next morning to find the perfect product.
There are no shortage of paint and varnish options in Canadian Tire, and I eventually decided on water-based Varthane Premium Diamond Wood Finish outdoor varnish for the easy cleanup it offered.
Then, I rushed back home to varnish the table and admire my handiwork. The result was fantastic and worlds better than the ratty old table I had started with.
I still have to touch up the paint on the legs and give the entire table another good coat of varnish to ensure the paper stays protected, but overall I couldn’t be happier with my custom picnic table!
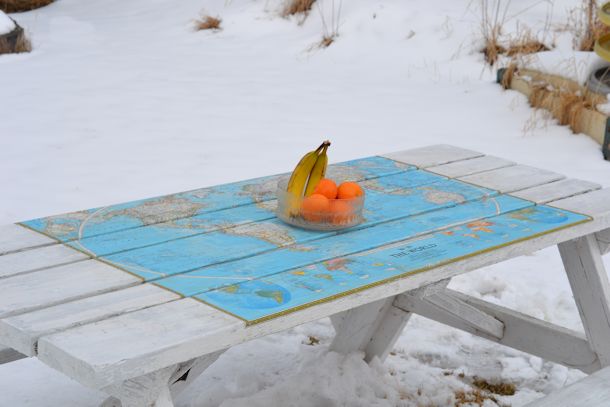
While this old map suited my style perfectly, a fun poster or even strips of wrapping paper would work well also. The sky’s the limit when it comes to perfecting that custom picnic table for your backyard.
Best of all, this project was incredibly cheap! Of my $25 budget, the only expense was the varnish, which cost just $22.99. What more could anyone want from a stylish spring makeover project?
that is so awesome , i love it so cool great job :)
I so love this! It’s such a great idea and you’ve inspired me to do something similar with an old table I have here. #client
I think this is so wonderful. I think we would all be learning from it, and could spend lots of time picking places we want to see. Thumbs up!
Love what you’ve done with it! Well done!
That is such a neat idea as It makes the table so interesting
That’s a great idea! My family loves looking places up on the globe and maps. We would love this! We will have to do it.
Looks like a project my husband would enjoy
awesome idea have to try
I really like this. It’s such a good idea.
This is such a good idea. I know of a few picnic tables that could use this makeover.